To resolve the error in the title of this post:
1. Set the following in "/etc/php.ini"
pdo_mysql.default_socket=/tmp/mysql.sock
mysql.default_socket = /tmp/mysql.sock
mysqli.default_socket = /tmp/mysql.sock
2. Comment out the following line in "/protected/config/main.php" of your app:
'ipFilters'=>array('localhost','::1'),
3. Restart Apache:
sudo apachectl restart
Showing posts with label snow leopard. Show all posts
Showing posts with label snow leopard. Show all posts
Tuesday, November 22, 2011
Thursday, January 06, 2011
libxml2 ios example. libxml2 in xcode
This is a bit of a messy post, but it involves getting apps written using libxml2 to compile in Xcode.
1. Firstly, you'll need the libxml2 framework for Snow Leopard (and annoyingly, gcc to compile it).
You can download the latest libxml2 (get the .tar.gz) from here: ftp://xmlsoft.org/libxml2
Extract the files. Then do a
sudo ./configure
sudo make install
Boom. You're getting there. You can now open your Xcode environment.
2. When you first try to compile, you might get something like "libxml2 _xmlXPathNewContext referenced from" as an error.
This is because the library is not linked in the project yet.
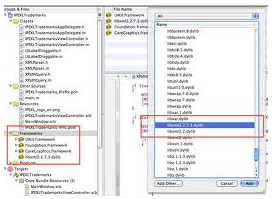
You can link it by right clicking on the "Frameworks" folder, then "Add" -> "Existing Framework"
If libxml2 is installed on your system, you should be able to see it in the drop down box. As in the following screenshot:
3. The other thing that must be done. Is to put the string "/usr/include/libxml2/" in your search paths for your project. This is found by left clicking on your main project. Then clicking the blue 'info' button, followed by the 'build' tab.

I hope this helps someone save hours of frustration and searching like I did.
1. Firstly, you'll need the libxml2 framework for Snow Leopard (and annoyingly, gcc to compile it).
You can download the latest libxml2 (get the .tar.gz) from here: ftp://xmlsoft.org/libxml2
Extract the files. Then do a
sudo ./configure
sudo make install
Boom. You're getting there. You can now open your Xcode environment.
2. When you first try to compile, you might get something like "libxml2 _xmlXPathNewContext referenced from" as an error.
This is because the library is not linked in the project yet.
You can link it by right clicking on the "Frameworks" folder, then "Add" -> "Existing Framework"
If libxml2 is installed on your system, you should be able to see it in the drop down box. As in the following screenshot:

3. The other thing that must be done. Is to put the string "/usr/include/libxml2/" in your search paths for your project. This is found by left clicking on your main project. Then clicking the blue 'info' button, followed by the 'build' tab.

I hope this helps someone save hours of frustration and searching like I did.
Gcc on Snow Leopard
Yesterday I was trying to compile something that required gcc. To my horror gcc was not installed on my Snow Leopard.
Strange, because it is said that gcc comes as part of the developer tools.
Apparently not. I needed to install the developer tools from the Snow Leopard CD itself. Which worked.
Which caused a problem of me losing my entire SDK for iOS. Which needed to be installed once again. (2.9 gig download - ouch)
This nice blog has a link to all the different XCode downloads for iPhone/iPad SDK, etc: http://chris-fletcher.com/2010/08/28/howto-install-iphone-sdk-2-0-3-1-for-xcode-3-2/
Wednesday, December 08, 2010
Make a PDF smaller in Mac OS X without any fancy tools
This has been frustrating me for a while. While Preview is an awesome bundled tool and all, it seems to think it is acceptable to create HUGE PDF files.
In order to not be hated by my EMail recipients, (see this comic strip: http://theoatmeal.com/comics/email), I tried to make the file size smaller. Here's what I tried and failed.
Also; Being the stubborn ass that I am, I wanted to do this without installing any extra tools.
My Original Size: 7 Pages of typed letter (i.e. a signed NDA agreement) at 3.8Mb (Ridiculous)
Attempt 1:
Open PDF in preview, click on File->Save As, Select 'PDF' and Quartz Filter=Black and White.
Fail: The size reduced to 594kb, but most of the text was faded out or missing. Not good.
Attempt 2:
Same as above; Open PDF in preview, click on File->Save As, Select 'PDF' but this time Quartz Filter=Reduce File Size.
Fail: Size was amazingly 217kb, but nothing could actually be read since the text had been totally blurred out. Not acceptable.
Attempt 3:
Same as above; Open PDF in preview, click on File->Save As, Select 'PDF' but this time Quartz Filter=Grey Tone.
Fail: Size was a whopping 15Mb.
Things were starting to get annoying.
So here's what finally solved it. Which is not pretty by any means.
1. Export each and every page in the PDF to JPEG format one by one.
2. For each new JPEG file, click on Save As->JPEG, then set the quality nearer to the 'Least' setting on the slide. Mine made each file about 100kb each.
3. Recreate the PDF by opening the first JPEG file in the series in Preview, then clicking View->Sidebar-Show Sidebar. Then drag and drop each of the JPEG files into the sidebar in order.
4. Select all the images in the Sidebar and then click on File->Print Selected Images.
5. Click on PDF-Save as PDF to create your new file.
My final file was 700kb and just as readable as the original.
Finally a win. Albeit a pyrrhic win.
For more about manipulating PDF files, try these following posts:
Free and Fast Way to Accurately Convert PDFs to Excel Files
Printing to PDF with doPDF
Concatenating PDFs with Ghostscript
Wednesday, October 20, 2010
Total Commander/Midnight Commander for Mac
So there comes a time in life when you need Total Commander, Midnight commander or any of the norton commander clones out there, but you're using a Mac and there's no such thing. That's what happened to me today.
So, later I realized that Total Commander is just a clone of Midnight Commander, which is a clone of Norton Commander (or whatever order of cloning may have taken place).
But then...
I found muCommander. Which has a build for Mac OS X. Woohoo!
Download it at http://www.mucommander.com/
So, later I realized that Total Commander is just a clone of Midnight Commander, which is a clone of Norton Commander (or whatever order of cloning may have taken place).
But then...
I found muCommander. Which has a build for Mac OS X. Woohoo!
Download it at http://www.mucommander.com/
Sunday, July 25, 2010
Enable .htaccess in Mac OS X Snow Leopard Apache
To enable .htaccess files in Mac OS X Snow Leopard:
1. Open terminal. Go to
cd /etc/Apache2
2. Then edit httpd.conf by typing:
sudo vi httpd.conf
3. Search for 'AllowOverride' by typing
/AllowOverride (+ return)
4. Change the line to:
AllowOverride All
(by using 'i' to insert and 'esc' to finish inserting text)
5. Search again for 'AllowOverride' by typing
/AllowOverride (+ return)
6. Change to:
AllowOverride All
7. Repeat these steps until all instances of AllowOverride are set to 'All'
8. Then save the file by pressing SHIFT+ZZ.
9. Then you need to edit your own website's file. CD to 'users' by
cd users
10. Then look for your conf file by typing:
ls
11. My file is called mark.conf, so I edit it by typing:
sudo vi mark.conf
12. Again, make sure the respective line reads:
AllowOverride All
13. Restart Apache by disabling then re-enabling 'Web Sharing' in System Preferences.
Saturday, July 24, 2010
MySQL for Mac OS X Snow Leopard
Simplified:
1. Go to here to get MySQL for Mac: http://dev.mysql.com/downloads/mysql/
2. Download the 32 bit .dmg archive. Click 'No thanks, just take me to the downloads!'
3. Run the archive and installer. (i.e. the mysql-5.x.xx-osx10.6-x86.pkg)
4. Set your root password by opening terminal and entering:
cd /usr/local/mysql/bin
sudo ./mysqladmin -u root password mysecretpassword
(I couldn't figure out the default password, nor was I asked to enter one during the installation)
5. Login and test it.
./mysql -u root -p
6. Open the dmg file you downloaded in step #2. Run the MySQLStartupItem.pkg.
7. Download MySQLWorkbench from http://dev.mysql.com/downloads/workbench/5.2.html if you need a GUI.
Friday, July 16, 2010
Sunday, July 11, 2010
Mac OS X, Windows XP and Data Drive (Three partitions)
Bootcamp is a wonderful tool, but also a pain when you wish to do non standard installations. What I wanted to do was have 1. MacOS HFS+ partition, 2. Windows XP NTFS partition and 3. Data partition (in NTFS format so it can be read between Mac and Windows).
The reason I like to use the third partition is so that I can share my Thunderbird E-Mail folder between Windows and Mac, not to mention various other things like Dropbox folder and work related files.
So to begin with, I can say this was slightly a struggle. First of all I can discuss the things I tried that DID NOT work. Those are:
1. Naively thinking that I could just make a third NTFS partition in Windows (i.e. D: drive) and it would work. No it doesn't. Windows just simply refuses to boot if you have that 3rd partition. I got some problem about HAL.dll not being present, NTLDR is missing, or some other disk error, no matter what I tried.
2. Booting into the Windows XP recovery console via the CD and doing something like 'attrib -H -R -S c:\boot.ini, del c:\boot.ini, bootcfg /rebuild, fixboot.' Save this step. It didn't work for me.
3. Expanding HAL.dl_ from the Windows CD in the i386 folder. Didn't work.
So let's get to the good stuff. The steps that worked. Largely inspired by this site, I was finally able to achieve my dream of having three partitions.
Note: You will NEED Snow Leopard to do this. This is because Snow Leopard secretly has some support for read/write of NTFS if you dig deep.
1. Boot into Snow Leopard.
2. Open Disk Utility from 'Finder->Applications->Utilities->Disk Utility. Make your partitions 1. Mac HFS, 2. Mac HFS, 3. FAT32. Label partition 3 as 'BOOTCAMP'
3. Restart the machine, and run the Windows XP setup. There's no need to install it fully at this stage. Once you reboot, you can go back into MacOS and proceed with the next step.
4. Backup the Windows partition using WinClone (important, you MUST use WinClone and don't skip this step)
5. Download and install Tuxera NTFS for Mac for NTFS support.
6. Reboot
7. Using Disk Utility, erase the 2nd partition as made earlier and format it to 'Tuxera NTFS.'
8. Restore the image, as created in step 4. (This is the most important step).
9. Restart the machine and try to continue with the Windows installation. It 'should' work.
For some reason, after four days of fighting with the system, it all worked smoothly and I was able to continue with my Windows installation and haven't had a problem booting Windows since.
Subscribe to:
Posts (Atom)